|
This stuff is awesome! I just set up my Solidoodle to run this filament and it is amazing the strength and flexibility it has. I printed off a one extrusion thickness vase and it can be folded in half and still return to shape- pictures with be coming on some new parts that can be made with it. Taulman Bridge
0 Comments
From one of my customers:
ukmat71 01-28-14, 06:55 AM not sure if anyone remembers but i put a post up last year mentioning a knocking sound coming from the roof when i go over bumps in the road. upon inspection i was missing the rubber shoes that fit onto the slide bracket for the sunroof.Also reading a few posts where the sunroof glass had actually shattered i thought this could possibly be one of the causes. this was also the reason i had to push the roof glass upwards at the rear whilst pushing the open button to get it over the roof lip (those that have the same problem will know what i mean there) asked Cadillac Europe for a price for the missing rubber shoes , and they came back with something that made me spit my coffee out it was so funny We have info on the roof parts required. They are not available in Europe at the moment, £197.97 plus vat each when available. Part-numbers-25747592 & 25747593. it appears i have to purchase the whole bracket (when they become available) quick conversion £240 inc vat works out at around $400 a side for , $800 total...... I told them it could wait at that price i could probably get the sunroof glass included. so the search began , thanks to this forum i found a guy called Ben , goes by ultra680sp on here, he has a 3d printer, new technology to me but from research it prints things layer by layer to make 3d plastic parts. he told me he can supply a kit that would enable me to repair the knocking noise and enable the roof to open again without having to push it upwards. in total the whole kit alone with 4 glide shoes, 3 tubes of silicon grease (Rheosil) ,4 brushes (ones i dont use will be perfect for my daughters make up parties) and full instructions only cost with shipping $70. bit of a no brainer for me , even i could work out the math, a saving of over $700 received the kit a few days later wrapped up in a nice copy of the Wall Street Journal (what strange long and thin newspapers you have in the US , all the time i have stayed at my vacation home in Florida i have never read one yet, we have short fat ones in the UK) so after a bit of reading the news from October 3rd 2013 i am now ready to fit them. only factor that is against me is the weather here in the UK , some of you may know we have had the worse weather for years , since coming back from Florida for thanksgiving we have had wind , rain , snow , wind , tidle surges , flooding , wind, rain need i go on. what i would give for a nice weekend so I can spend the time to actually fix this issue. photos hopefully will appear below. The shoes look a little larger than the rubber ones (only managed to find 1 rubber one , but may find them all when i clean all the tracks out) but I am hoping they will stop the metal to metal contact and raise the glass by around 1mm which should be all it needs to get over the roof lip. So when I eventually get round to fitting them I will update you guys again but what with the weather being horrible and the putting of of both my tax returns every day until the deadline (UK ones due in 2 days so leaving it a little short) still have a month or 2 to file my US returns. everything is delayed. anyway on with the pics , thanks again to Ben ( ultra680sp ) for the kit. 01-29-14, 06:19 AM great information...look forward to reading more on this after your install... Bill Professor Wizard 01-29-14, 12:05 PM Wow.. someone actually using a 3D printer to actually make something useful! For sure... keep us updated! bendebusk 01-30-14, 03:24 PM Sounds like the ultra view option may have been unnecessary in the UK...yep, it's raining! :) ukmat71 04-05-14, 12:53 PM Been meaning to do this for ages now , but the sun has been shining and the wifes away for the weekend so took the sensible option of fixing the roof whilst she's away. could not take pictures though as camera is with the wife. so will try to explain what i did. It took around 2 hours from start to finish, and relatively easy to do , even just with little me. open the roof around 8-10 inches. unscrewed the roof glass (4 screws roughly each corner) carefully removed the glass and layed it on my lawn, (better to have an extra person help to do this as i almost dropped it climbing down) removed small plastic end part of roof rail, for anyone that doent know there is a plastic lug sticking into the roof underneath and even after unscrewing the 2 bolts holding it you dont know. i just levered it up with a small pry bar. took the offending rear guides out and tried to work out how to fit the new shoes to them. ended up wrapping ptfe tape around the metal guide plate to build up enough so that the new shoes would be a tight fit,cut it down with a hobby knife to fit the new shoes so they would be a prefect fit. i also used a metal file to smooth the shoe surfaces that would slide in the rails. cleaned the rails out with hoover, brush and some old rags used the Rheosil to lubricate all the rails , making sure to get into the hidden parts that you cannot see, slid the brackets back and forth a few time to spread the lube around. almost dropped the glass again trying to get it back in place so help even more vital for this bit, its quite heavy the glass not a good idea climbing up again on your own. re-attached the 4 bolts to each corner. turned ignition on , closed roof. then pressed the open button, the blind started moving back then the glass moved back without assistance from me. not taken for a test drive , but already i know the glass is in so much tighter now so hopefully my knocking sound will have disapeared. there must have been around 10mm of movement before , thats down to around 1mm so after owning my SRX for almost a year i think its back to all being fixed , all by myself , with a little help from the garage when i first collected her. just awaiting my paint shop to re-spray my rear door again from when daughter slid her cycle along it. (they got the wrong black , apparently theres over 400 black paints for cars , i thought that would have been the easy one not to mess up.) and it should be like a new car again. thanks again Ben ( ultra680sp ) for supplying the shoes, great items , and much less drag than the old rubber ones that were fitted. ultra680sp 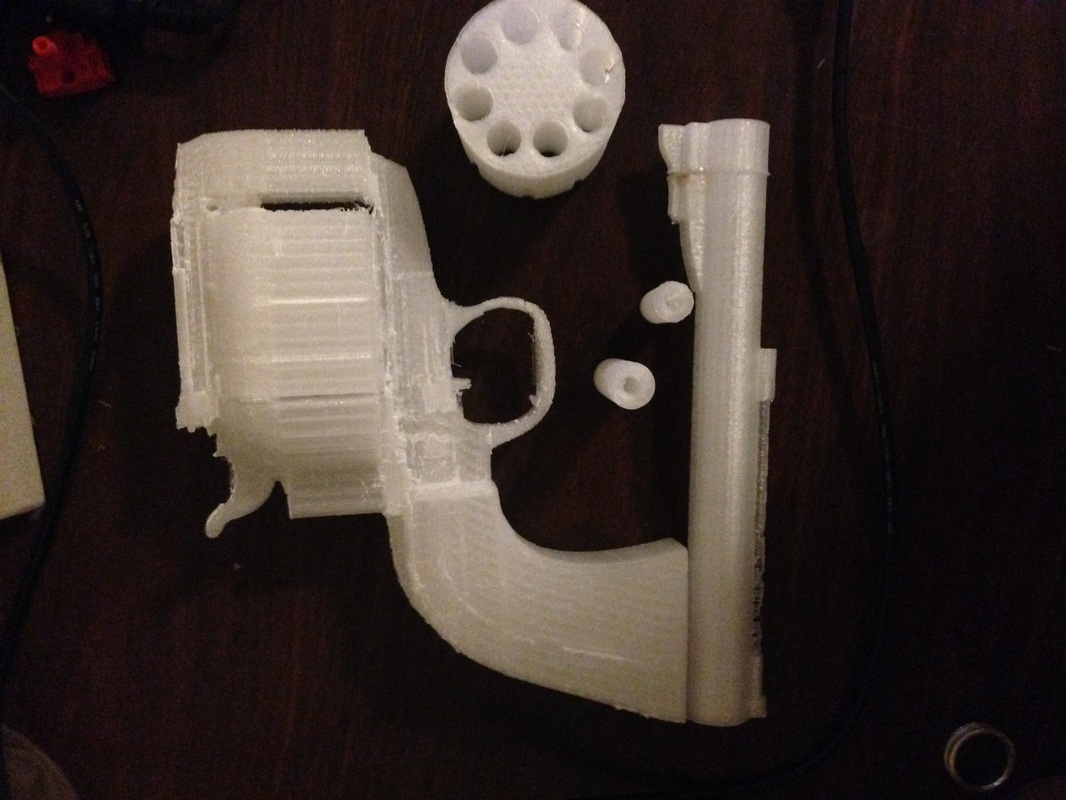
Ruger Blackhawk- several things learned through this- http://www.netfabb.com/ - agreat website to break down the models for easier fabrication- the end of the barrel had to be modified with this program. Unfortunately I didn't cut up the gun body before printing. Instead I used a whole bunch of support material that had to be chipped off. 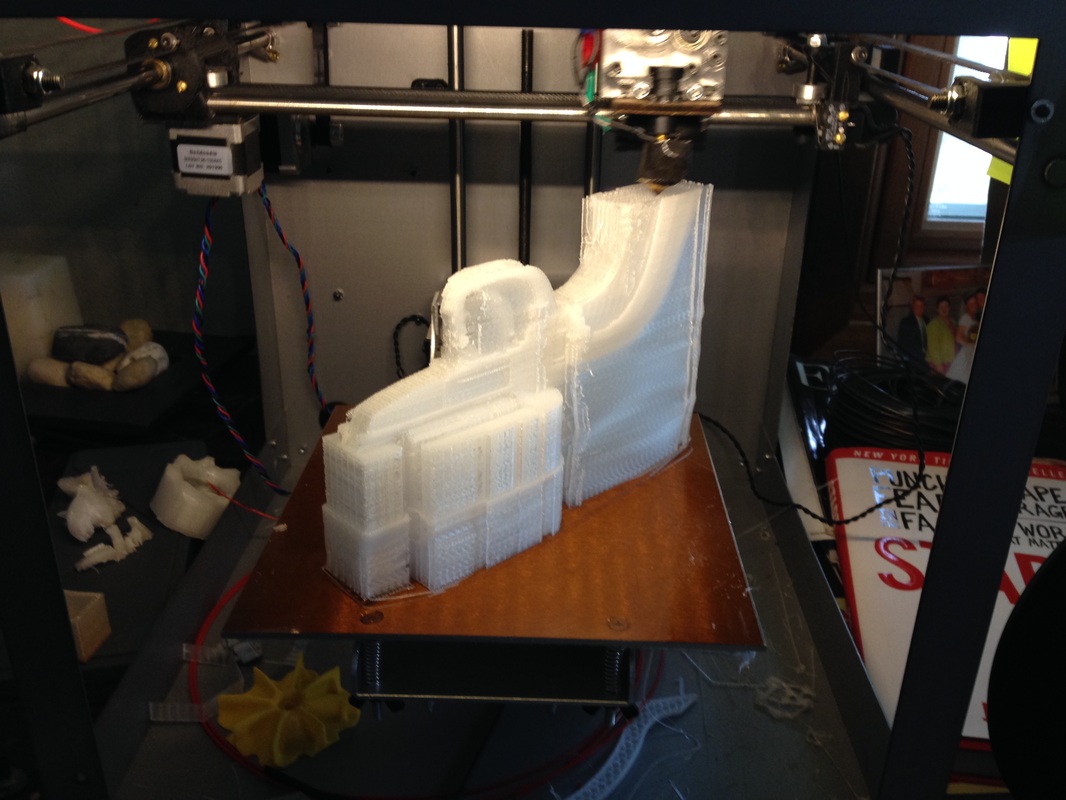
For future prints I will cut the print up and use much less material.
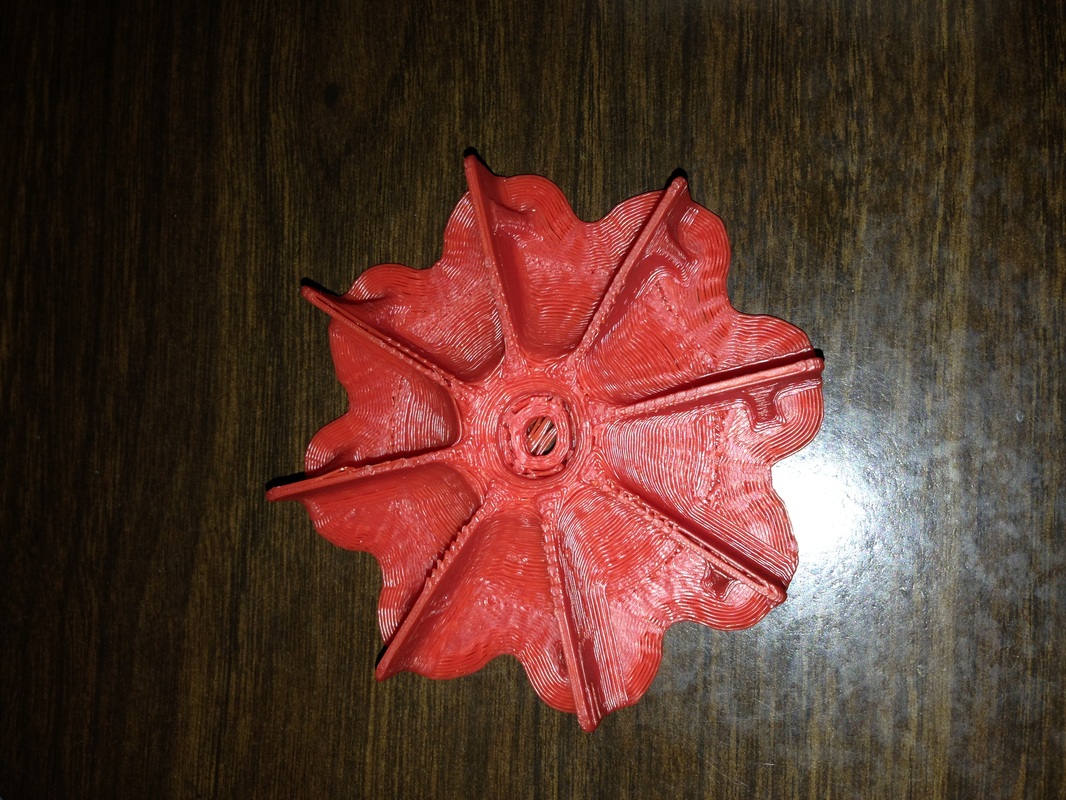
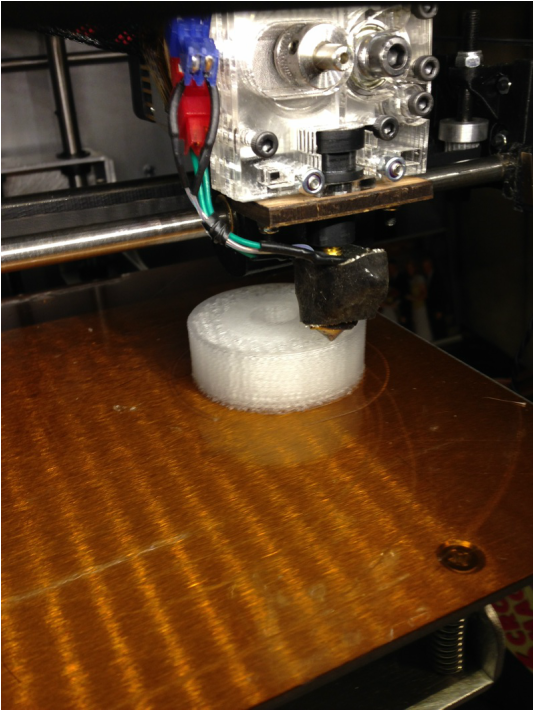
This print is to be used for making leather holsters, the leather has to be wetted, then the model is placed in the leather and as the leather dried it shrinks around the model- plastic is alot safer from rust than the real thing. 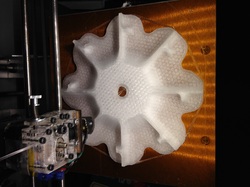 One of the big projects for the month was a new impeller/fan for the Ryobi leaf shredder/blower. The back story on this is I went to dump some metal in the local recycling bin and found this leaf blower that seemed to be in operating condition- I pulled it over it had compression- so I figured I'd take it home and maybe bring it back to life- well it fired right up but vibrated like a CR500 motorcycle- no problem I thought- just buy a impeller from the company and I have a $40 leaf blower. That didn't work out - forced obsolescence is the key word here. Well nothing else to do but make it myself and I did. This is a picture of it being built layer by layer- all 17 hours worth. 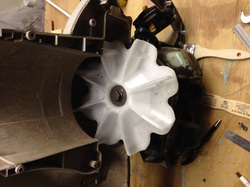 Installing it was a bit tight- with the support material it takes some finessing to get the thing to fit just right-
I got it all put together and made sure to wear some safety gear- leather boots, gloves and goggles- never know if that ABS could tear through the two layers of plastic covering when spinning at 8000RPM- It held together and I think created its own security by being to high flow for the engine and overpowering the engine when speeds get too high- It does the job though and is working great- have maybe an hour on it but leaf blowers aren't normally used that much- I figure it should do the job for awhile- next time I'll print it with Nylon and that should be even stronger. The printer arrived, after 4 weeks and several emails back and forth to Solidoodle - I have a printer. After waiting 3 weeks and not seeing any updates from the SD site- I sent them an email. Apparently there was a miscommunication about the orders and my had fallen through- luckily the Customer Support rep was nice and got the printer coming my way- Oh- this was after the printer had gone on sale a week after I had ordered- they weren't willing to give me the sale price but said they would throw in a spool of ABS- Great. So after 4 weeks and much anticipation it arrived- set up was fine although after closer inspection the print bed doesn't seem to be flat- another email to our friendly service personnel- still in progress there. Still I am able to print and am having some success. Fine tuning seems to be a process. I still am not completely satisfied although there are plenty of knobs to keep tweaking in the end it is what it is- a consumer printer- not as sturdy as I would like although it was never marketed or sold to make commercial products. 
Have now sold a couple of the Ultraview kits and a few individual parts and Rheosil. A shout out to UKmat71 for buying and installing the first kit.
http://www.cadillacforums.com/forums/cadillac-srx-first-generation-forum-2004/448033-ultra-view-roof-shoes.html It went all the way to the UK to a nice SRX there. Apparently GM doesn't have the same part options that we have here in the states. Sounds like the install went well and his roof now sits where it should. It is great knowing that I was able to create value for someone. Now just need to get my printer and start making other parts. There is quite a list once people find out that you can make stuff. From ModZ RC parts to Plastic guns for leather work it just gets more interesting everyday. First feed back from the initial Ultraview kit that was sold. Looks like I need to come up with some rubberized inserts to help with the roofs that are really in bad shape. I'll let you read his feed back.
http://www.cadillacforums.com/forums/cadillac-forum/t-448033.html Still waiting for the 3D printer. The Helix printer has been delayed atleast a month so the testing still can't start. I have started working on a ModZ RC car articulation part that is supposedly hard to come by on the open market. I have been talking to friends to try and find parts that should still be in demand but not available from current suppliers- doing small run, high margin parts will hopefully get us enough experience to get into higher volume and more articulate designs.
Part of the purpose of this blog is to try and get input from the world out there for unmet needs. I have a engineering background with some designing experience that should help get parts designed and ready for sale. Let me know what you think. Welcome- Starting my first website to look at the profitability of using 3d printers to make consumer items. From what I've seen there are a lot of sites just like mine out there. Looking to use my hands-on engineering experience to create products for customers that are unique and economic. I look forward to hearing your comments about what you want and would like to see. I may be looking at a market that is already saturated but I am interested in finding out. ---There is only one way to find out!
|
AuthorBen Hanks- Engineer with background in Engines and new technology. Archives
September 2014
Categories |
 RSS Feed
